Home grown Cafe Racers are perhaps the very epitome of the custom motorcycle scene. Bespoke machines, often created by their owner/riders with just one purpose, to enjoy!! – not just to ride at 100mph, but also to build, something 38 year old self-employed car mechanic Aaron Bromley, also known as “Brom’, did in between working fourteen hour days, seven days a week in the garage he set up with wife ‘Smiff’.
Based on a 2002 Bonneville, which had been retired to under a tarpaulin due to a duff ignitor, was going to be sold by Aaron’s dad Bryan for a paltry £800. Not wanting the bike to sell or leave the family, Aaron took the bike on as a project, in full payment for spending time, money and parts working on his dads car.
Aaron was now the owner of a none running and uninspiring 52 plate Triumph Bonneville, not deterred by the state of the Hinckley Twin, Aaron turned to Google for help, finding a Triumph Cafe Racer which had been fitted with a glass-fibre seat cowl and tank, totally changing the look of the bike. The seed was sewn for what was to come next, and not wanting to create a ‘plastic pig’, Aaron once again turned to the internet for help, but now finding videos on Youtube on how to form metal.
A few hours later and fully briefed on what to do… sort of, and armed with a ball pein hammer, a lump of high density sponge and some sheet steel, Aaron set to work. Im skipping the bit where Aaron turned out bits of roughly formed sheet steel, and where Aaron glued bits of polystyrene together, and the moment where a friend described his work in unfavourable terms. Instead I will take you to where things start to take shape, literally.
Aaron was now fully aware that creating a Cafe Racer tank, or something which didn’t resemble an ash-tray wasn’t going to be ‘easy’, but this didn’t stop Aaron. Round two began with the fabrication of a wooden buck, used as a solid surface to shape the alloy into the desired form. Next was to build an english wheel (as you do), put together from an old hydraulic coil spring compressor, combined with a set of wheeling anvils from Ebay – this was to be used to roll out any imperfections in the alloy.
Aaron now continues the story behind this fascinating and incredible Café Racer build….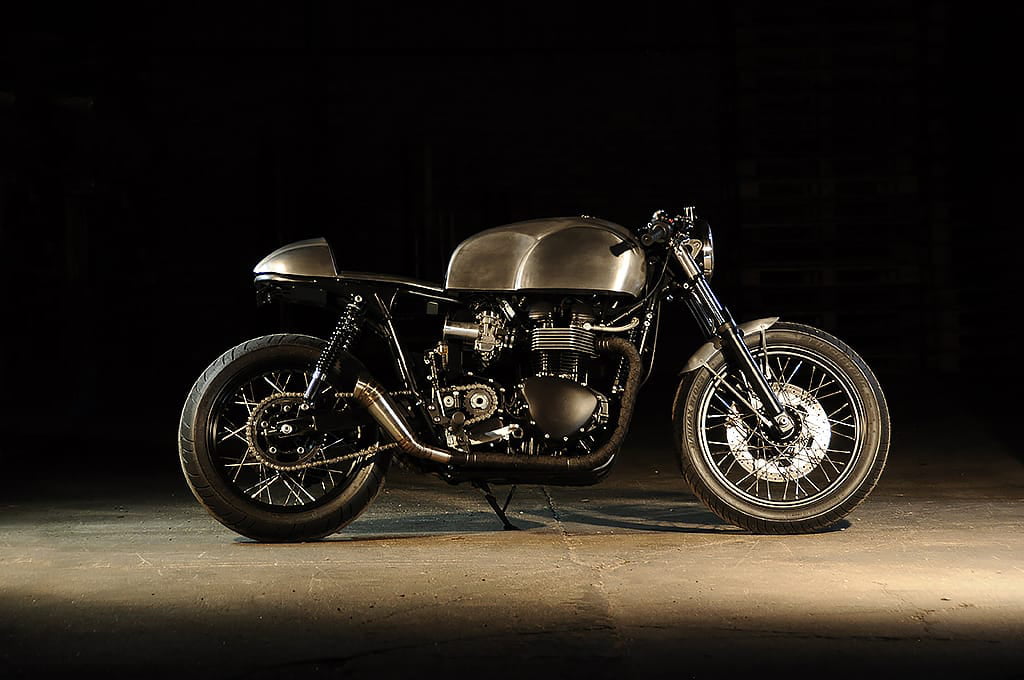 “The tank eventually started to take shape and the problems of shaping it were getting solved. When the tank unfinished, but mostly complete, I started the seat unit for a bit of variety. I didn’t want to make another buck, so decided to just see what shape blank I needed to start with and had a try, it was close enough that I kept it.”
 “Once the seat hump and tank were in the most part the shape and size they would be, but still completely moveable, it meant that with the seat rails in their original position the tank had to lean back to marry with the seat.
The sub frame got chopped off and moved up to allow alignment, but it also gave a bit more leg room now the thick seat pad was removed. and a bit more room for the carbs to be seen. Now that the sub frame has been moved up, instead of jacking it up, so didn’t disturb the original geometry I kept it the same I just had to order longer shocks plus a bit to jack it up 15 mm from stock so it rides really stable.” “I then turned my attention to the exhaust and it was decided that a sectioned look would be best. It’s made by having to cut V pieces out of stainless steel exhaust tube and welding them together to make cones. Each end can has 3 different size cones that I then used a band saw to cut them into bits accurately. They have got a baffle but they have got a big hole at the end so it’s quite loud but my friends have said it’s not offensive.
“Once the bike had been spun round in the shed and it was viewed from the back it looked like the shocks covered the exhaust also making the tyre look lost. All shock mounts were cut off, new ones made and re-positioned 15 mm inwards each.
Hagon provided me with the rear shocks and were incredibly helpful all the way through the sub frame changes. They even sent me a mock up damper to make sure everything fitted before new ones were supplied. Big thanks to them.” “Now it had the stance , the tank, the seat and exhaust the carbs were offered up to see where the intake trumpets would go. Long trumpets are what was needed but decided I would have a go at metal spinning them so I could get the ones I wanted.
I got some steel bar and turned a mandrel on Webbos lathe and also altered his lathe to actually spin on so big thanks to him. It took half a sheet of material and 48 attempts plus hours of You tube but I did manage to make 4 trumpets many ash trays and tea light holders.”
“The head lamp bowl is the original but I cut the sides out and welded tube in to let it sit back into the forks and then moved the OE speedo in the top. Warning lights are in the top yolk because they fit perfectly using the OE weather proofing and I would need to blank the holes anyway.
After finishing all the lumpy parts I was making it was getting close to Christmas 2015, so that would be the big dry build finish. Me and Smiff only get to have the Christmas week off (boo hoo) so it meant I would have over 7 days to get it running and working with only strip/paint/rebuild afterwards.” “The week started with the job of mounting the battery under the seat along with new homes and fixings for ugly bits. Then the job of wiring alternations for different switch gear etc. I originally taped some parts that were on show but swapped it for the braided sleeve as it allows the cables to more easier and it doesn’t look crap.”
“Bolting all the pedals/levers/lights etc on started to come to an end so I had final job of pressure testing the tank for pinholes. I pumped up the one part of the bike that very nearly broke me in making. There were a couple of pin holes that got sorted but around an aluminium mount for the tap there was another hole.

The only problem was the bung was welded from the inside to keep neat plus when I originally welded it in the material didn’t like its new home and it got a bit black. I decided because it was such a small pin hole I would put some fuel proof resin on the outside and suck it into the hole by a vacuum.
It was a complete success and I popped the leak free tank on and fired it up. Webbo popped round a bit later because it was the big fire up day so I pushed it out, fired it up, walked round it and put it back into the shed.” “Smiff went to get a celebratory Chinese so I took the opportunity to nip in the shed and see if the tank had remained leak free. (I had taken the tank off and put it on the bench so it didn’t get dented and make it easier to check).
I can’t explain the roller coaster of dis-belief and this must be a dream emotions I had when in one second I noticed the right front side of the tank had been sucked in like a pop bottle when my amazing “suck goo in the hole” idea had been implemented. I quickly got the mitivac and tried pushing it out (which it has mostly) but no, it was ruined.”
“I eventually got over it and pushed on stripping, blasting, painting and also zinc electroplating the many bits that make it up. I bought the plating kit and then spent a month turning the shed into a lab with many tubs of chemicals to plate all the original bits, it gives a different look to stainless and will be good and rust free for at least as long as the originals but probably a big longer hopefully.” “Webbo has a blasting business so he kindly blasted the frame and engine, plus satin blacked the engine for me. He also kindly donated some new blasting media for my cabinet which has had a bit of hammering this last few weeks.
I had a local wheel builder (Five one Wheels) Steve Lomas build my rear wheel while I did the front.Steve is an ex-speedway champion and very clever boy especially with wheels. He laces up wheels for racers of classic bikes, speedway bikes and everything else.
When I went to see him about buying a wider 4 ¼ rear rim he convinced me that an 18” rear wheel would be the way to go, so he did a stunning job of the rear. I can just about, given the time, strip and rebuild a wheel but making new spokes/drilling the rim and then lacing it up in a new way, no.” “When Steve had finished the wheel it was taken out of the shed and spent the last week of build up in the front room where it still lives now. Last May bank holiday weekend was MOT and first run out on it. Only to the testing station and home as it wasn’t taxed obviously. It pulls well and if you allow yourself to sit in it like you’re going for it, everything becomes easier.
The tank is high enough to rest on and the weight comes off your arms and it all seems to work. You do look a bit of a tool at a steady 55 but it’s worth it.” “The bike has had a full nut and bolt strip and rebuild excluding the engine.I took the rocker cover off and checked the clearances, had a look to see how it was wearing as well as carrying out a cylinder leakage test and all is good. New parts fitted are, tyres, chain sprockets, levers, rear shocks, cables and lines, rear light, ignitor coil, leads, plugs, 2 x oil and filters, crank sensor, breather and a jet kit. There are also odd nuts, bearings, seals, bolts, and the wheel rim and rebuild. Big thanks go to all involved but especially my wife Smiff. If it wasn’t for her feeding, bathing and clothing me there would be no spare time, so no bike.”